A well-developed chest goes a long way to cast a positive first impression. It will give you an air of size and strength as well as courage, poise, and confidence when meeting someone for the first time. For the less-experienced, building the pectoral muscles may seem challenging and only attainable by spending hours under a bench press at the gym followed by countless protein shakes and other supplements.
Fortunately, this is not the case. Crafting a powerful chest can be done inside or outside of the gym, and today we’re going to show you how to build chest muscle at home with OR without equipment so that you can develop impressive pectorals no matter what your workout situation is.
Understanding The Pectoral Muscles
The muscles of the chest are the large muscles responsible for ‘pushing’ motions – but be careful here. Yes, the motion is a pushing motion, but be aware that muscles can ONLY pull or shorten in length even though the motion is a pushing motion.
The biggest of the muscles that make up the chest is the pectoralis major. This is the king of the chest. It is a large fan-shaped muscle (hence the word ‘major’ in the title) that is responsible for several motions at the shoulder, including flexion, medial rotation, and adduction. For the most part, we will be working with adduction and to a lesser degree flexion of the upper arm at the shoulder.
Adduction is the motion of bringing your upper arm across your chest toward the midline of your body. A good example of flexion at the shoulder is if you were standing and you lifted your arm in an arching motion straight up in front of you. Imagine the arm motion involved in a backstroke, if that helps.
The pectoralis major is so big, in fact, it can be subdivided into several sections. The reason I mention this is because we can actually change the angle of resistance and stress the upper half vs. the lower half a bit. It is common to see the pecs divided into thirds, but it isn’t possible to isolate the middle portion from the upper or lower.
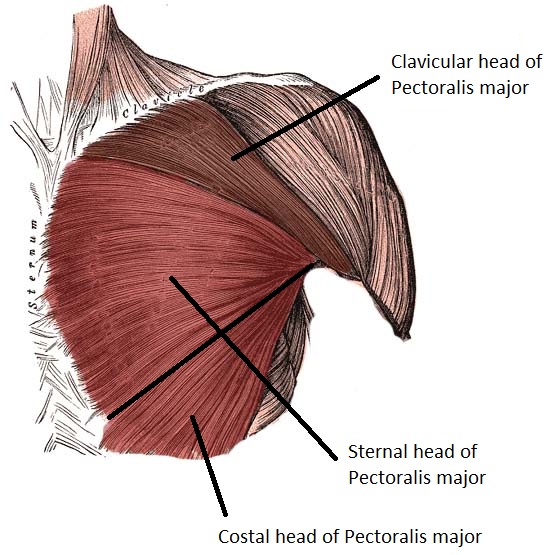
1. Clavicular Bundle
You might hear this more commonly referred to as the upper pec. It is named due to where it attaches to your skeletal anatomy. The clavicular bundle originates on the bottom side of your clavicle as well as the sternum, hence the name.
2. Sternal Bundle
This would be the middle portion of your chest named, of course, because it attaches to the sternum.
3. Costal Bundle
Think of this as the lower pec and, you guessed it, named because it attaches to the 2nd through 6th ribs or costal portion of the body.
The other two muscles of the chest, depending on who you ask, are the pectoralis minor and the serratus anterior. I say depending on who you ask, because there are those out there who will include the serratus anterior as part of the chest. In my mind, that is up for debate. So with that in mind, I am going to blow off the serratus anterior and focus on the pectoralis minor.
Think of the pectoralis minor as the little brother of the pectoralis major. It is a much smaller triangle-shaped muscle lying under the pectoralis major, and when contracted will pull the shoulder blade down and forward.
How To Build Chest Muscle At Home – Without Equipment
There are several ways to do this at home. Let’s start with the basics and show you some movements that use just your bodyweight as resistance.
Push-Ups & Push-Up Variations
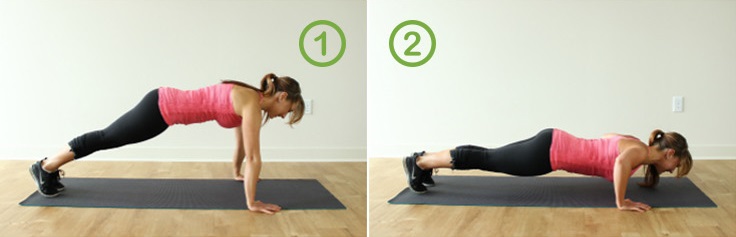
1. The Basic Push-Up
I am guessing the first thing that will come to mind is the good old “tried and true” push-up. And I do mean old! I am not sure if push-ups have been around since the dawn of man, but I am guessing if they weren’t invented by the ancient Greeks or Romans, they were at least on the committee that named them.
One of the benefits you might not think about with an old school push-up or any form thereof is that if you use proper form your core will be fully engaged the entire time to maintain your plank.
Let me put our chest workout on pause for one moment and talk about a plank. When we refer to a plank we are talking about a body position where if I drew a straight line from your ear to your ankle it would also pass through your shoulder, hip, and knee. The core muscles are largely responsible for maintaining your plank.
Below is the framework for the perfect push-up:
a.) Maintain a strong plank throughout the entire range of motion. If you are having issues with this, think tight abs and clinched glutes. That should bring things in line for you.
b.) Your hands should be at your sides about shoulder height or just slightly below and wide enough that when you get to the bottom of the range of motion your forearm should be perpendicular to the ground or elbow stacked directly above your wrist. Your hands should be positioned so that your middle finger is pointing straight ahead or even just slightly turned out.
c.) With arms extended at the top of the range of motion, lower yourself under control to a point at which your elbows achieve a 90° angle or smaller depending on your flexibility level. I personally lower myself to a point in which my chest is 4”-6” off of the deck, which for me is just slightly less than a 90° angle at my elbow.
All other variations will be a modification of this common garden variety push-up.
2. Crucifix Push-Up
The big difference between a regular push-up and a crucifix push-up is hand placement. You may also hear this referred to as a wide grip push-up. You can vary the width of your hands to work up to a true ‘crucifix’ position. Be aware that the wider your hands the harder the push-up will be. You may also find that the wider you go the more comfortable you are with your fingers turned more outward. Play with the angle to find your happy place.
3. Narrow Push-Up
Think of this as the opposite of a crucifix push-up. Instead of a wide hand position, your hands are close together. You’ll sometimes see this done with hands put together in the shape of a diamond made by your thumbs and index fingers (aka the diamond push-up, a variation of this). You will still be working your chest with a narrow push-up, but you will feel a lot more force coming from your triceps on this one. See below:

4. Archer Push-Up
Think of this as a wide grip push-up with lateral movement. Your hands won’t be quite as wide as a crucifix push-up to allow for some lateral movement every other repetition. Every repetition you shift your upper body weight so that one arm is in a regular push-up position and the other arm is in a wide grip push-up position. Perform a push-up and then move laterally to change sides, alternating as you finish your set.
5. Incline Push-Up
This is performed just like the regular push-up with one slight modification: your hands are off the floor 12”-16”. This will put a little more tension on the lower pecs.
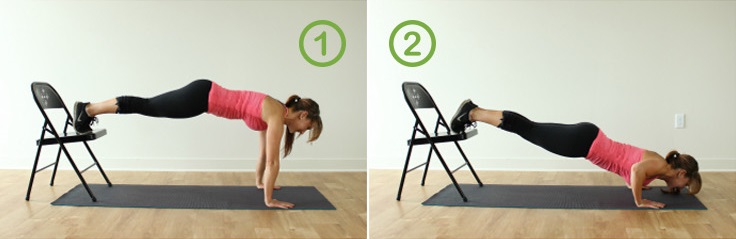
6. Decline Push-Up
This is the” yin to the yang” of an incline push-up. You guessed it, your feet are elevated 12”-16” off the deck, and this is going to stress the upper pecs a bit. Using a chair to elevate feet, as shown below, is the most common way to do things:
7. Uneven Push-Up
Your position will be basically the same as a regular push-up with one slight change: one hand will be elevated about 6”-8” higher than the other. Make sure you alternate sides every set to make sure each side gets hit evenly.
8. Scorpion Push-Up
Set yourself up in a regular push-up position, clinch and hold your plank, then lift one foot off the ground bending 90° at the knee. Be aware as soon as you lift one foot off the floor, that now unsupported hip is going to want to drop. Hold your abs tight and clinch those glutes to keep those hips level as you perform your push-up. The push-up gets its name from the foot sticking up in the air resembling a scorpion’s tail. Again, alternate legs each set.
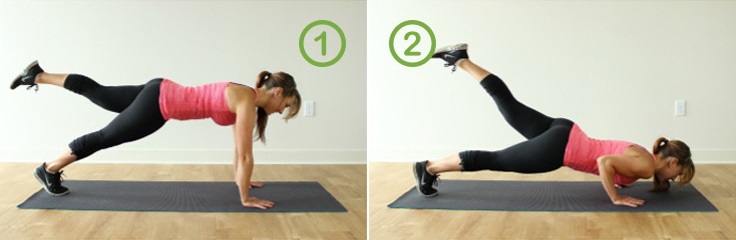
9. Single-Leg Push-Up
This is similar to the scorpion push-up, however, instead of lifting just the lower leg by bending at the knee, this version has you lift the entire leg in a straight line from the hip with the force being generated from the glute and hip. As you can see below, this takes some balance and skill:
It should be noted that this is NOT an exhaustive list of push-ups, and we could go on and on and on: dive bombers, fingertip push-ups, knuckle push-ups, clapping push-ups, walking push-ups, alligator push-ups, handstand push-ups, Spiderman push-ups, blah, blah, blah… but let’s talk about how to make them a little easier for those that are just starting out.
Push-Up Regression For Beginners
What if the standard push-up is too hard for someone just starting out? How do I make it easier, you may ask? There are two simple ways we can modify push-ups for those just starting out and new to working out.
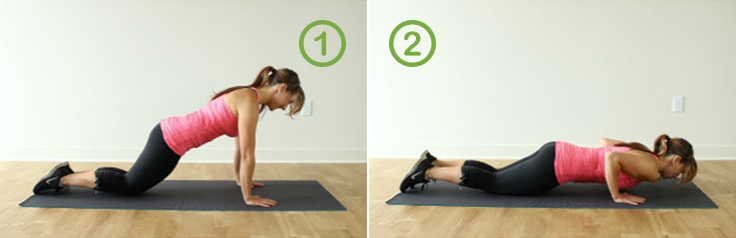
The first would be to perform them from your knees instead of your toes, as shown above. The reason this works is basic physics. Think of your body as a lever, and we know that the longer the lever the more force it will take to move it. By performing push-ups from the knees we end up creating a shorter lever thereby requiring less force to move it.
The second way to make a push-up easier would be by changing the angle of the lever we want to move. This is easier than it sounds. Think about how easy it would be to stand leaning against a wall in a standard push-up position and performing push-ups against the wall versus being on the floor performing a regular push-up. Need an intermediate resistance level? Try that same push-up on a kitchen counter. Regression and modification just takes a little bit of creativity and a VERY basic knowledge of physics.
How To Mimic A Fly Motion Without Weights/Equipment
The two motions most commonly thought of to work the pecs are a press and a fly. A press is the basic movement pattern involved with our family of push-ups or a pushing motion. Think of a hug as a fly motion, or maybe envision Sampson chained between two ancient columns supporting the temple he destroys by pulling his two outstretched arms together.
A fly can be done without equipment, but takes a little creativity!
1. Towel Fly
You will need to be on some sort of typical hard flooring you would find in a home, i.e., hardwood floor, linoleum, etc. You will also need a pair of towels or place a pair of socks on your hands, something that will slide across the workout surface.
Start in the normal push-up position with a nice straight plank. For an easier version, start on your knees instead of your toes, similar to the push-up regression we outlined earlier. A rolled up towel under your knees will increase the comfort factor on the hard floor.
From this starting push-up position, lock your elbows with a slight bend, slide your hands apart horizontally as wide as you are able. The wider you go and the closer your body gets to the floor the harder this movement will be. At this point, to come back up to the starting position, draw your hands horizontally towards each other.
2. Frisbee Fly
The only difference between the towel and Frisbee fly is that the Frisbee fly is done on carpet, and instead of towels under each hand use a pair of Frisbees or, in a pinch, a couple of paper plates would work. Otherwise, everything else remains the same.
How To Build Chest Muscle At Home – With Equipment
For the sake of this article, I am going to address this as if there was a basic dumbbell set or adjustable dumbbells in play as well as a weight bench (although you could always go one step further and invest in a solid home bench press).
Dumbbell Presses
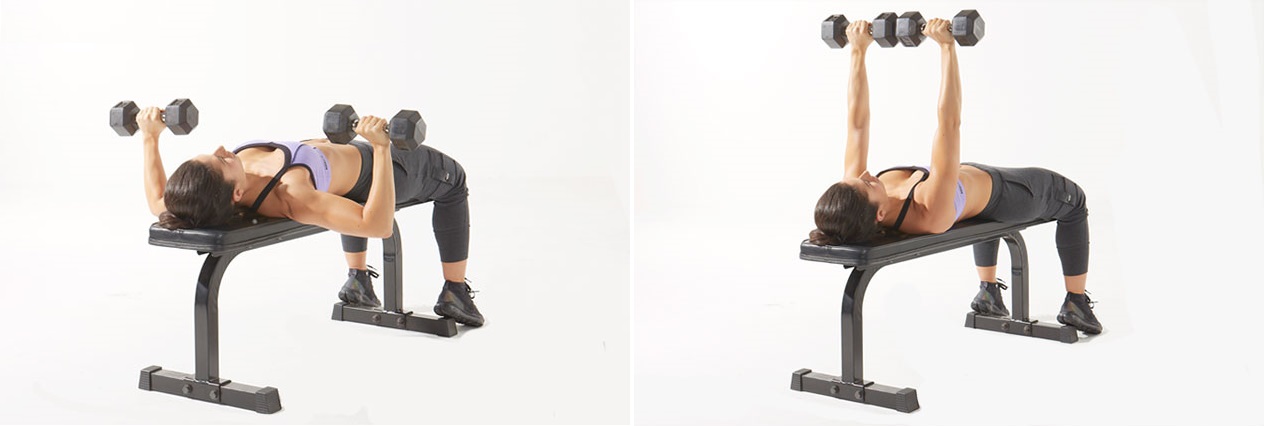
1. Flat Dumbbell Press
Starting position:
Lie face up on the workout bench with your feet flat on the floor and your back flat on the bench. Your arms should be straight with dumbbells straight over your chest.
Movement Pattern:
The range of motion here is slightly different than the range of motion for a push-up. Envision your hands tracing the shape of a triangle or pyramid. From the starting position, slowly bend at the elbow lowering the weight. As you do, your hands should begin to gradually get wider apart. Stop when your hands are 4”-6” above the level of your chest. Reverse directions and push the weight back up to the starting position. As your hands go up they should slowly get closer together, finishing with elbows extended and dumbbells next to each other.
Safety Factors:
a.) Keep your back flat during the entire range of motion. Fight the urge to arch your back.
b.) Hands should never be outside of your elbows during a press. A common newbie mistake is to “square off” the movement pattern or try and lift the dumbbells straight up and once the elbows are extended then bring the hands together, tracing the shape of a square instead of a triangle.
2. Incline Dumbbell Press
The goal here is to isolate the upper pecs. All the factors in a flat dumbbell press are in play here. The difference is the angle of the bench.
I will be very honest here; the optimal bench angle is one of those hotly contested debates in the fitness world. If you Google it you are going to find anything from 10° – 60°, which is a HUGE range if you ask me. The one thing the experts agree on is that the higher the angle the more stress you will shift from the upper pecs onto the anterior deltoids.
I personally stick with an angle between 10° -30° myself. The first two notches on most workout benches will put you in this range.
3. Decline Dumbbell Press
You guessed it. This would be the opposite of the incline dumbbell press, in that it will isolate the lower pecs. This may or may not be an option for you, depending on your bench. Not all home benches will invert. The decline press mimics the flat press, with the exception being that you are slightly inverted for this exercise.
Dumbbell Flyes
1. Flat Dumbbell Flyes
Starting position:
Lie face up on the workout bench with your feet flat on the floor and your back flat on the bench. Your arms should be straight with dumbbells straight over your chest.
Movement Pattern:
Lock your elbows in a slightly bent position throughout the entire range of motion. Your hands will trace a large arching or sweeping motion ending with your arms outstretched as if you were trying to stretch your chest. Stop when your hands are the same level as your chest. Reverse direction to return to the starting position. Envision yourself giving someone a bear hug here.
Safety Factors:
a.) Keep your back flat during the entire range of motion. Fight the urge to arch your back.
b.) Do not lock out your elbows in a fully extended position. They should have a slight bend to prevent hyperextension.
c.) Do not let your hands drop below your shoulders at the end of the range of motion. The further down you go, the more you apply a shear force to the shoulder.
2. Incline Dumbbell Flyes
Similar to the incline dumbbell press, this exercise is incorporated in an attempt to isolate the upper pecs. The only difference between flat dumbbell flyes and incline dumbbell flyes is… you guessed it, the bench angle. I am also guessing you have deduced that the same sort of bench angle as the incline bench press is in order here, and you would be correct!
3. Decline Dumbbell Flyes
I am assuming you have got more than a few operable brain cells rolling around in your noggin and you have already figured out a pattern here. Just so we are clear… this is the same as the other two fly versions, but with a bench adjusted to decline in an attempt to isolate the lower pecs.
Alternative Equipment To Use
There are a few pieces of equipment I would strongly suggest purchasing to supplement your home gym if have not already done so, and you can add a lot of variety to your chest routine! We will go over a few below, but for a more detailed list check out this home gym equipment buyer’s guide.
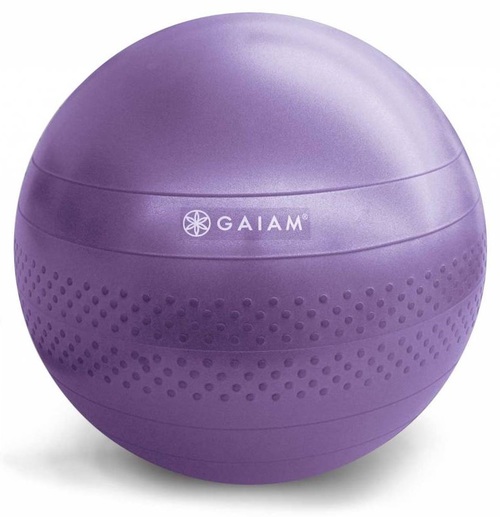
1. Stability Ball
This may take a small amount of “out of the box” thinking here for some. You can easily use a stability ball, not only for incline and decline push-ups but also as a substitute for your workout bench. You can perform dumbbell presses as well as dumbbell flyes. Your core will be working a lot harder to stabilize you on a stability ball vs. a weight bench. An added bonus is you can micro adjust your angle on your incline movements. The one con is you are out of luck with decline work on a stability ball.
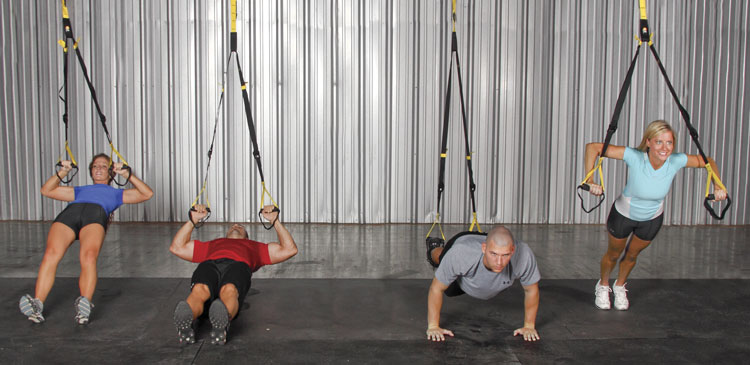
2. Suspension Trainers
In my opinion, there is no one piece of equipment that is the do-all-be-all or silver bullet of the fitness industry. However, with that being said, I think suspension trainers are about as close as we are going to get. You can easily vary your angle of body lean to micro adjust your resistance level on the fly in the middle of a set if needed. Your core will get hit no matter what you are doing, and you can get a complete full body workout on one. As far as chest work is concerned, we can easily do both presses and flyes on a suspension trainer.
3. Resistance Bands
Resistance bands and tubing are very versatile and useful tools in a home gym. They are a very valid substitute for free weights with the advantage of changing the direction of resistance, where the only direction of resistance with free weight, of course, is being provided by gravity. You are really only limited by your imagination when it comes to bands and tubing, so pick yourself up a good set of resistance bands and get to work!
Conclusion
If you’re new to fitness, learning home workouts can sometimes seem daunting, especially when talking about a muscle group as important as the pectorals. Hopefully, this guide has given you an easy-to-understand walkthrough on how to build chest muscle at home, no matter whether you have weight equipment or not.
ABOUT THE AUTHOR

Tim Clark
Tim is a full-time gym manager/personal trainer, part-time gym designer, part-time blogger, and part-time pseudo-entertaining public speaker as well as a former college athlete and former firefighter with a BS degree from Fresno State in Kinesiology and an AS degree in Respiratory Therapy. His passion is seeing everyday people get healthy and live life to the fullest.