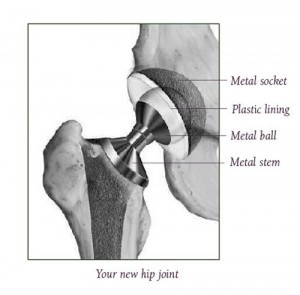
The Artificial Hip Joint
The life span for total hip implants has increased to 20 years or more for 80% of total hip patients. That being said, generally speaking, the more you use the hip joint, the faster it is likely to wear out. It is also important to remember, that this data is based off of older generation implants and techniques. As such, the outcomes may have gotten better in recent years.
The artificial joint, called a prosthesis, is typically made of specialized metal and plastic. The two parts fit together to make a new hip joint with smooth surfaces that glide in a natural and comfortable motion. There are numerous hip prostheses currently on the market. Generally speaking, as far as what is known, they are all pretty much equal. Surgeons have specific implants that they prefer to use mainly based on how they trained, etc. When you decide to undergo surgery, it is recommended that you have the surgeon use the implant that they are most comfortable with, unless there is a specific reason why that implant wouldn’t work for you.

The Hip Replacement Operation
The Artificial Hip Joint (Prosthesis)
There are many types of hip prostheses on the market. The type of prosthesis used for your surgery is usually decided upon by your surgeon based on your age, your lifestyle, and the surgeon’s past experience. Each prosthesis is made up of two parts: the acetabular component—or socket portion—which replaces the acetabulum, and the femoral component—or stem portion—which replaces the femoral head.
The femoral component (femoral stem) is made of a metal stem with a metal (or ceramic) ball on the end. The acetabular component is typically a metal shell with a plastic inner socket liner. The type of plastic used is very tough and very slick – so slick and tough that you could ice skate on a sheet of the plastic without much damage to the plastic.
The stem component can be cemented or uncemented. With the cemented component, cement acts as a grout to hold the stem inside the thigh bone. With the uncemented component, the component is press-fit (meaning squeezed) into the thigh bone and then is additionally designed to allow for bone to grow onto or into the component which improves its fixation into the bone. Both types (cemented and uncemented) are used by modern hip surgeons and are acceptable treatment options.
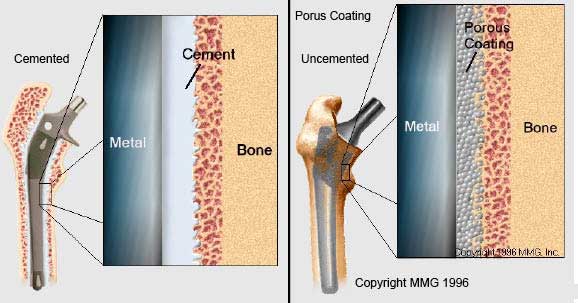
A cemented prosthesis (left image) is held in place by a type of epoxy cement that attaches the metal to the bone. An uncemented prosthesis (right image) has a fine mesh of holes on the surface area that touches the bone. The mesh allows the bone to grow into or onto the mesh and “become part of” the bone.
Steps in the Hip Replacement Procedure
Before surgery, an intravenous tube (IV) is placed in your arm or the back of your hand. This tube supplies your body with necessary medicines and fluids that you will need before, during, and after surgery. Also, you may begin receiving anesthesia through this tube.
There are other wires and tubes attached to or placed in your body. These help monitor your body’s functions, remove excess fluid, and help you breathe during surgery.
After you are put to sleep, your hip area is then scrubbed with a germ killing soap. When everything is ready, the surgeon makes an incision in the skin over your hip.
There are several approaches to the hip joint that you may hear about. Traditionally, the posterior approach to the hip has been used by most surgeons. More recently, the anterior approach has become more popular and is being more frequently used. Lateral approaches can also be performed.
While there are advantages and disadvantages to each of the above approaches that will be discussed by your surgeon, it is most important to go with the approach that your surgeon is most comfortable doing. Excellent and very equal results can be achieved with any of the listed approaches in experienced hands.
After the initial skin incision is made, the ligaments and muscles are separated to allow the surgeon access to the bones of the hip joint. It is this part of the surgery that makes the ligaments and muscles weak after surgery. Until they heal, which can take 6 weeks to 3 months (or more), you must follow special hip precautions to prevent dislocation of your new hip joint.
Before reading on, review the anatomy of the hip.
Preparing the Femoral Head
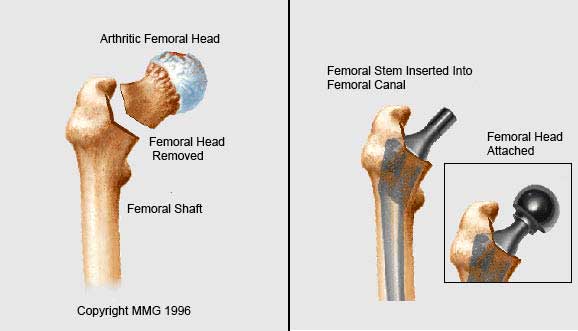
Removing the Femoral Head
Once the hip joint is entered, the femoral head is dislocated from the acetabulum. Then the femoral head is removed by cutting through the femoral neck with a power saw.
Preparing the Acetabulum
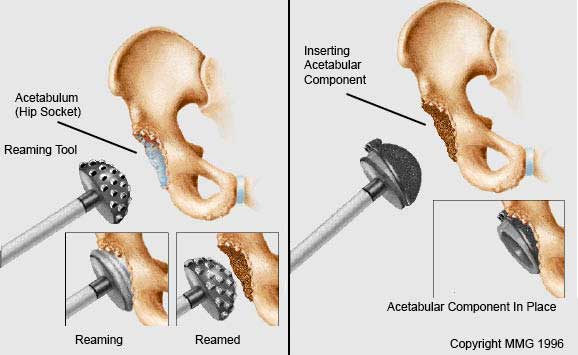
Reaming the Acetabulum (Left image.)
After the femoral head is removed, any remaining cartilage and other soft tissues are removed from the acetabulum using a power drill and a special reamer. The reamer is used to make sure that the acetabulum is prepared to exactly fit the hemispherical metal shell of the prosthesis.
Inserting the Acetabular Component (Right image.)
Trial components are duplicates of the real component that come in a variety of sizes and shapes. These trial components are used to find the right size of component and fit for you—one with good stability. Once the right size and shape is determined for the acetabulum, the actual acetabular component is actually hammered into place to get a good squeeze fit. The metal shell is simply held in place by the tightness of the fit. Sometimes screws are used to make the fit more secure. A plastic lining is then most commonly inserted into the metal shell.
Cement is only very rarely used for the acetabular component (i.e. perhaps if you’ve had previous radiation to the pelvis for cancer, multiple previous hip surgeries).
Preparing the Femoral Canal
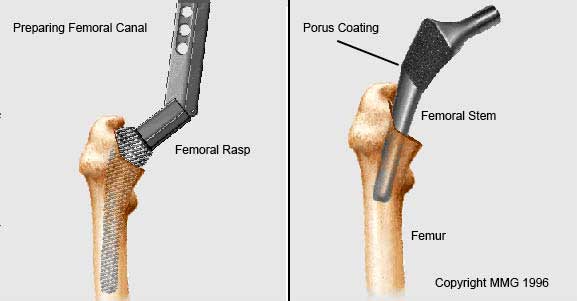 Preparing the Femoral Canal (Left image)
After the cup is prepared, attention is then turned back to the femur. To begin replacing the femoral head, special rasps are used to shape and hollow out the femur to the exact shape of the final metal stem of the femoral prosthesis to be inserted by cleaning out loose and spongy bone. Once again, trial components are used to confirm the correct size and shape.
Inserting the Femoral Stem (Right image)
Once the size and shape of the canal exactly fit the femoral component, the stem is inserted into the femoral canal. Again, in the uncemented variety of femoral components, the stem is held in place by the tightness of the fit into the bone (similar to the tightness achieved by putting a bigger nail into a smaller drill hole). In the cemented variety, an epoxy type cement is used to bond the metal stem to the bone.
New Joint is Completed
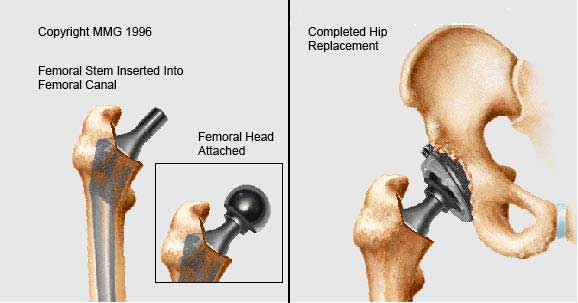
- Attaching the Femoral Head (Left image)
- The custom fitted ball that replaces the damaged femoral head is attached to the femoral stem (it is made out of either metal or ceramic). Typically, a trial ball is placed first and the surgeon first tests the movement and stability of the hip joint, assess leg lengths, etc. Once he/she is satisfied with the implants, he will place the final real ball on the femoral prosthesis and reduce the hip (manually put the femoral head back into the socket)
You now have a new weight bearing surface that has replaced your diseased hip (right image).
X-ray of New Joint is Made
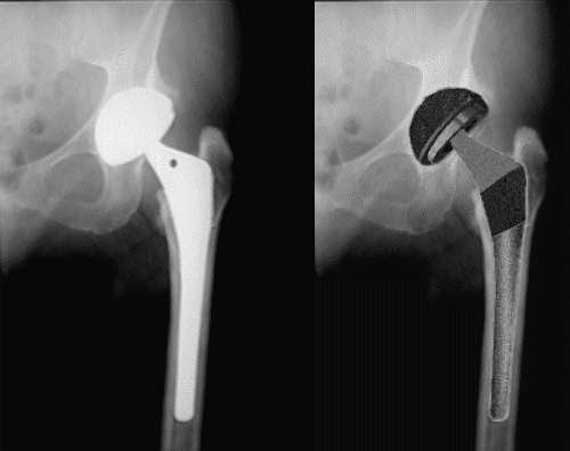
X-ray of hip replacement to ensure it Sometimes before your incision is closed, an x-ray (image) is taken to make sure your new prosthesis is in the correct position (This may also be performed in the recovery room). Then the hip muscles and tendons that were temporarily moved or cut to get into the hip joint are put back or repaired. The skin is closed with stitches or staples. A drain may kept in place to drain off fluids. Then you’re taken to the recovery room.
Waking up in the Recovery Room
While in the recovery room, you will gradually wake up—it takes 1-3 hours for anesthesia to wear off. You may feel groggy from the anesthesia. Other symptoms of anesthesia include blurred vision, dry mouth, nausea, sleepiness, or confusion. You may hear sounds from the equipment around you and your nurse telling you that surgery is over. You will still have tubes (oxygen) and monitors attached. The monitors provide the recovery room nurses with data on how your body is recovering. Special pneumatic stockings (pulsatile type pumps) may be on your feet and legs. These pumps massage your legs to help prevent blood clots.
While it may be hard to focus in the recovery room, it is important to remember to tell your nurse if you feel any numbness, tingling, or pain in your feet and legs. If you need pain medicine, don’t wait too long to ask for it. It is easier to prevent pain than to stop pain.
Hospital Room
Most of the time, you will stay a night or two in the hospital following surgery. During this time you will have multiple exercises that you will be asked to do to help prevent complications such as pneumonia and blood clots.
One, you will be asked to “pedal” your feet up and down. The special stockings you will be wearing along with these pedaling exercises help prevent blood clots and help to improve blood circulation in your legs.
The nurses will also teach you how to perform your deep breathing exercises to prevent lung problems. Oftentimes you will be given a breathing machine called an incentive spirometer. It is important that you use this machine as much as possible both while in the hospital and while at home during the first days after surgery.
Once your pain is controlled on oral pain medications and you have been seen by physical therapy, you will likely be able to be discharged home. In most cases, this is on day 1 or 2 following surgery although more recently, “outpatient” hip replacement surgery is being performed to allow for same day discharge.
If a drain was placed into your hip during surgery, it will be removed prior to your discharge.
Be sure you are entirely clear on instructions regarding any hip precautions, follow-up appointments, and any medications that your surgical team wants you to take for your individual surgery before being discharged home. In regards to medications, in addition to pain medications, your surgical team will likely put you on a blood thinner to prevent blood clots from forming. There are several drugs that are currently used for this purpose including: aspirin, xarelto, and warfarin (coumadin).
Other Considerations Following Surgery
The sensation of having unequal leg lengths after surgery is a common complaint. While your surgeon will make every effort to maintain the leg length that you had before surgery, there are no guarantees that they will end up exactly the same. As such, once you are up and walking around, you may find that your leg is now a fraction of an inch longer or shorter than it was before surgery.
Sometimes, if your surgeon is anticipating that you will need hip replacement on the other side later on, he/she may intentionally lengthen the affected leg so that it is easier to match leg lengths during the second surgery.
Finally, despite actually being the same length following surgery, because you affected leg may have actually been shorter than the other leg (due to arthritis), it may actually feel longer for a short period of time until your body gets used to its new normal length.
When to Call Your Surgeon
Hip replacement is usually a very successful operation, but there are things to look out for following surgery. Call your surgeon immediately or go to the nearest emergency department if you experience any of the following once you get home:
- If you are having chest pain or difficulty breathing.
- If your thigh, calf, foot begin to swell or become increasingly painful
- If you notice any progressive numbness of the leg
- If pain in your hip gets worse or uncontrollable despite proper use of medication
- Any fevers higher than 101.5°F
- If you experience any excessive nausea or vomiting
- If you experience continued draining or bleeding from the surgical incision
- If any signs of infection around the surgical incision: redness, swelling, hotness to touch, pus-like drainage
Keep 24-hour phone numbers handy. Call your surgeon’s office if you feel you are not healing as you should. Check your incision every day when you change the bandage for signs of infection and to make sure it is healing as it should.
In any joint replacement surgery, continued drainage is a big problem and a significant risk factor for infection! If the wound is draining, that means bugs can get inside. Let your surgeon know right away if your wound is continuing to drain.
If you think you have a fever take your temperature. If you have signs of infection or other complications, call your surgeon right away.
If the signs tell you it’s an emergency and you cannot reach your surgeon, call 911.
More Articles About Hip Replacement
The information presented here—in timeline order—can help you learn what to expect when having a hip replacement from planning through recovery.
- Total Hip Replacement: a guide for surgery and recovery
- Your Visit with the Orthopedic Surgeon
- Minimally Invasive Hip Replacement
- Making Arrangements for Hip Replacement Surgery
- Pre-surgery planning and timeline
- Getting Ready for Hip Replacement Surgery
- The Hip Replacement Operation
- Complications of Hip Replacement Surgery
- On the Road to Recovery After Hip Replacement
- Hip Precautions After Hip Replacement
If you have questions after going through this information or the information brings up questions for you write them down and contact your surgeon.
Note that the information in this article is purely informative and should not be used in place of recommendations from your surgical team.
The images on this page are used with permission by Medical Multimedia Group, 308 Louisiana Avenue, Libby, Montana 59923. MMG holds the copyright on their images.
